Tuesday, March 6, 2012
Friday, February 24, 2012
MAKING A GREAT PATTERN FOR DESKTOP GLASS
A good paper pattern is critical for accurately ordering glass for a shaped or irregular surface. If your surface is a standard straight-sided shape (square, rectangle, trapezoid, etc..), see our article on measuring for desktop glass. If your surface is irregular, has curved edges, or otherwise does not lend itself to simple measuring, then you’ll need to make a good pattern. Just follow these steps:
- Use a single piece of blank paper that is larger than the surface to be patterned, with a minimum of 2 inches of paper hanging over the edge. If you don’t have suitable paper, stop by our office and we’ll give you some! Do not use newspaper, cardboard, Christmas wrapping paper, or other printed paper. If your paper is too narrow, you can tape two pieces together. Be sure to use a good quality, strong tape such as masking or duct tape. If you are needing to pattern only the rounded or angled corners of an otherwise rectangular surface, you can use paper that is just large enough to cover the corner (see Figure 2 below).
- Tape the paper down to the surface. Cut holes/slits into the center portion of the paper, approximately every 12 inches. This will allow you to tape the paper down securely without having any tape around the edges, where you will be making a pattern (see Figure 1 below).
- Hold the side of a pencil at an angle against the table edge, and rub it along the edge. A crisp, clear, single continuous line is critical for accurate transferral to glass, and it may take some adjusting of the pencil angle to get a good line (see Figure 3 below).
- For surfaces that do not have a 90° edge angle, tracing can be difficult. Figure 4 below shows the point at which the outer edge of glass should stop on several decorate edges. If you have difficulty making a crisp line on these edges, it is recommended that you bring the furniture piece to us, or call us to come out to make a pattern.
- DO NOT CUT OUT THE PATTERN! Bring the entire paper to us. We will be much more accurate working with a clear, crisp line than with a cut paper edge.
 |
| Figure 1: Taping down pattern paper. |
 |
| Figure 2: Radius Corners |
 |
| Figure 3: Tracing along curved edge. |
 |
| Figure 4: Tracing a non-90° edge |
MEASURING FOR DESKTOP GLASS
Protective glass tops for desks, tables, credenzas, and other flat-surface furniture is an attractive and easy way to protect your household investments. This article will provide guidance about how to take measurements for your flat-top furniture surface. (If you’re looking for an actual glass TOP for a table base, where the glass is the actual surface itself, rather than simply covering a surface, contact us for help.)
Before you begin...
Test for a flat surface: Place a ruler or yardstick on edge on the surface — it should touch evenly along its entire length. Move the stick around to check the entire surface. If you find uneven spots, note their approximate depth, size, and location on the surface, and contact us for help. Do not order glass for an uneven surface without consulting us first! Our aim is to provide a quality product that will last, and the more information you provide, the easier it is for us to help you.
Type of glass: Most desktop glass is 1/4″ thick. Clear, Bronze, and Grey (either light grey tint or darker “Greylite 14″) are the most common types of glass for this application. If you’re looking for something other than these, contact us to discuss options.
Edgework: For a review of different glass edge treatments, see our article about edgework & corner options.
SIMPLE RECTANGLE: Straight sides, 90-degree corners
Most desks and credenzas, as well as many tables, are rectangles with straight sides and 90-degree corners. In this case, width & length, each measured to the nearest 1/16 of an inch, are typically all that is needed. HOWEVER, it is a good idea to check for squareness, to assure that the corners are true 90-degrees. The easiest way to do this is to measure diagonally from corner to corner, then again in the other diagonal direction. The two measurements should be equal. If they are not, the surface may not be square. In this case, see our article about making a paper pattern.
RECTANGLE W/ RADIUS CORNERS: Straight sides, rounded or angled corners
If the overall pattern is a straight-sided rectangle, but the corners are angled or rounded, you can often simply provide overall dimensions (as in “SIMPLE RECTANGLE” above), plus a paper pattern of the corners. Unless you are absolutely certain the four corners are identical, make a pattern of each one, and note the locations of each pattern on the overall piece (see our article about making a paper pattern).
TRAPEZOID OR OTHER STRAIGHT-SIDED SHAPE
In most cases, it’s safest to make a paper pattern of any non-rectangular surface (see our article about making a paper pattern. However, careful and thorough measurements of a trapezoid or other straight-sided shape may be sufficient. The sketches below show the dimensions that must be provided to assure an accurate glass piece.
With a right-angle trapezoid, the length of all four sides should be enough. Use a T-square to assure that the right angles are a true 90-degrees:

With a trapezoid lacking right angles, we will need not only the four side dimensions, but also the height of the shape from parallel side to parallel side (#5 in the sketch below):

With a parallelogram, you must measure not only the four sides and the height, but also the slope offset (#2 and #5 in the sketch at left). This can be very tricky to measure accurately, and it is strongly recommended that a paper pattern be made in these cases.

ANY SHAPE WITH ONE OR MORE NON-STRAIGHT SIDES
For any shape that has one or more sides that are curved, or otherwise non-straight, a pattern is a must.
Tuesday, February 14, 2012
HOW WINDOW EFFICIENCY WORKS

To the right you can see a window efficiency rating sticker from the National Fenestration Rating Council (NFRC). It's a sticker you should see on every new window, though sometimes, the actual ratings will vary a bit. Let's look at the ratings provided, and what they mean:
U-FACTOR (U.S./I-P): Lower = Better
Possibly the most common rating factor is U-Factor (sometimes called "U-Value"). It measures how well the window prevents heat from escaping, and lower numbers are better. The lower the U-value, the better a window resists heat flow, so the better its insulating value. U-Factor ratings generally fall between 0.20 and 1.20. Most windows considered "energy efficient" will have a U-Factor of 0.30 or lower.
SOLAR HEAT GAIN COEFFICIENT: Lower = Better
Another fairly common rating factor is Solar Heat Gain Coefficient (SHGC). It measures how well a product blocks heat caused by sunlight. As with U-Factor, lower numbers are better. SHGC is always a number between 0 and 1, and the lower the number the less solar heat it allows into the house.
VISIBLE TRANSMITTANCE: Higher = Better
Visible Transmittance (VT) measures how much visible light comes through a window, and it's expressed as a number between 0 and 1. Unlike U-Factor and SHGC, higher numbers are better when it comes to VT, because it means the window is clearer. Because U-Factor and SHGC are improved by adding physical coatings to the glass in windows, improving those numbers generally decreases VT. As such, window efficiency is a sort of balancing game between improving energy efficiency while keeping windows as clear as possible.
AIR LEAKAGE: Lower = Better
Air Leakage (AL) indicates how much air can pass through a window, and as you'd expect, less (i.e. lower number) is better. The actual AL rating indicates the cubic feet of air passing through a square foot of window area, which leaks through cracks in the window assembly. The lower the AL, the less air will pass through cracks in the window assembly.
CONDENSATION RESISTANCE
Condensation Resistance (CR) measures the ability of a product to resist the formation of condensation on the interior surface of that product. The higher the CR rating, the better that product is at resisting condensation formation. While this rating cannot predict condensation, it can provide a credible method of comparing the potential of various products for condensation formation. CR is expressed as a number between 0 and 100.
GLASS EDGE AND CORNER OPTIONS
The type of glass edgework that’s right for you depends on how your glass will be used, any surfaces on which it may be resting, & what appearance you like. The video below shows several types of edges and corners, and descriptions after the video provide additional information.
CLEAN CUT EDGES (often abbreviated CCE) are raw, unfinished cut glass edges; i.e. they’re sharp. Because it is an unfinished edge, thicker glass will likely show wavers or flares.
SEAMED or SWIPED EDGES have the sharpness of the cut edge removed, but are still unfinished, so they’ll show wavers & flares (particularly in glass 1/4″ and thicker). Seaming/swiping is done strictly a safety measure, to make cut glass easier to handle. It is recommended for use when the glass edge will be fully concealed after installation.
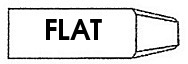
FLAT SHAPED EDGES are fully-finished and machined to a 90° profile. This is often used for desktop and tabletop glass. All sharpness, as well as flares and wavers, have been removed.
- FLAT GROUND EDGE (often abbreviated FGE) refers to a matte or satin finish.
- FLAT POLISHED EDGE (often abbreviated FPE) refers to a fully polished glossy edge.

PENCIL SHAPED EDGES are fully-finished and machined to a curved or arced profile. This is often used for thick desktop and tabletop glass. All sharpness, as well as flares and wavers, have been removed.
- PENCIL GROUND EDGE (often abbreviated PGE) refers to a matte or satin finish.
- PENCIL POLISHED EDGE (often abbreviated PPE) refers to a fully polished glossy edge.
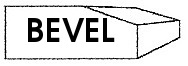
BEVELLED EDGES are sloped polished edges, often seen in mirrors. They are also sometimes seen in the glass inserts in coffee tables. Bevel width can be between 1/2″ and 1-1/4″.
FLAT v. PENCIL: What's right for you?
The difference between a flat-treated edge and a pencil-treated edge is largely one of cosmetics, and is a matter of personal preference. On thick glass — particularly 3/8″ and thicker — a pencilled edge (particularly pencil polished) looks quite striking, while on thinner glass the visual difference between flat and pencil profiles is quite subtle.
POLISHED v. GROUND EDGES: What's right for you?
If you’re using a glass top for a table or desk, the color of the wood surface will affect which edge finish will look best. A ground edge looks best on light-colored surfaces, and a polished edge looks best on dark-colored surfaces.
IS A BEVELLED EDGE SAFER?
All fully-finished glass edges,including bevelled edges, are safe for handling. A bevelled edge is decorative feature, and is more often seen on mirrors than on desktop glass. It gives the glass/mirror a “framed” appearance, by creating a sort of border-line around the perimeter.
EDGEWORK COST?
The cost of all glass & mirror edgework is directly related to complexity and time involved. The edge types described above are roughly in order of increasing cost. A ground edge is, in general, less expansive than a polished edge. Edgework done on straight edges is machined, and is considerably cheaper than edgework done on curved edges, as these must be done by hand.
DUBBED CORNERS have just the point of the corner quickly sanded off.
NIPPED CORNERS are a very slight angle, and can be thought of as large dubbed corners or small angled corners (see video).
ANGLED CORNERS are straight corner cuts. They are usually 45° angles, but do not have to be. Their size is determined by specifying the measurement of the cutback along each side.
RADIUS CORNERS are rounded corners, representing 1/4 of a circle whose radius is used to define the corner. For example, a 3/8″ radius produces a corner that is quite close to a U.S. dime coin; hence, it’s often called a 10¢ corner. Similarly, a 1/2″ radius produces a corner that is quite close to a U.S. quarter coin; hence, it’s often called a 25¢ corner.
Wednesday, November 9, 2011
BROKEN GLASS: SAFETY TIPS FOR CLEANING UP AND TRANSPORTING BROKEN GLASS
Dealing with broken glass can be scary, but it doesn’t need to be dangerous. These tips are designed to help you remain safe when you find yourself dealing with broken glass. Safety should always be your first concern, and you should never attempt any work with which you feel uncomfortable, regardless of advice given here or elsewhere.This article cannot cover every conceivable situation you may encounter, and the advice herein should never replace professional assistance when it is needed! –Contact us for help.
 CLEANING UP BROKEN GLASS:
TRANSPORTING GLASS TO ATKINSON’S FOR REPAIR:
GETTING YOUR NEW / REPAIRED GLASS HOME SAFELY:
- Clear the room of pets or small children.
- Wear a heavy long-sleeve shirt to protect your arms.
- Use heavy gloves to remove & discard large loose pieces of glass.
- Do not attempt to pull out large pieces that are still attached.
- Clean up small pieces and fragments with a shop vacuum or broom & dustpan.
TRANSPORTING GLASS TO ATKINSON’S FOR REPAIR:
- If you’re transporting a window sash, insulated unit, storm frame, or other item with broken glass in it, use packing or duct tape to secure loose pieces.
- Do not attempt pull out any pieces that are still attached!
- If you are able, place the pieces you’re bringing into a cardboard box for transport. You can also use cardboard, towels, or other sturdy material to wrap the pieces.
- Bring any & all pieces/parts you find, even if you’re not sure what they are.
- Don’t assume your glass or window is a “standard” size. Very little is “standard” in the glass business.
GETTING YOUR NEW / REPAIRED GLASS HOME SAFELY:
- MEASURE your vehicle carefully & thoroughly to be sure your glass will fit. It is difficult to accurately “eyeball” glass size. THIS IS VERY IMPORTANT!
- SUPPORT: Glass should ideally be transported on edge, with plenty of side support to make sure it stays upright. If it is to be transported laying flat, be sure you provide adequate support under its entire surface. A piece of plywood cut to the size of the glass is an ideal form of support.
- HAZARDS: Remove all objects from the area your glass will be placed during transportation. Metal, stone, and other hard objects and surfaces should be removed from the area.
- PETS: It’s best to leave pets at home when picking up glass. Their excitement about your new purchase may be understandable, but their safety is important, and claws can scratch new glass.
- DELIVERY: If you don’t feel comfortable transporting your glass, please consider having us deliver it for you. The extra cost may be well worth the peace of mind! — Contact us for help.
TYPES OF SCREEN MATERIAL
Screens let in air & keep bugs out — in general. You may have imagined that screen mesh — the woven stuff stretched into a screen frame — is a rather singular affair, and that you didn’t have many options for what type of mesh you could use. As it turns out, there are lots of options!
FIBERGLASS MESH
Fiberglass mesh is composed of vinyl-coated fibreglass threads, and comes in grey and charcoal colors. This is the most common type of mesh used in window and patio door screens because it’s the cheapest type, it’s easy to work with, and it lays flat and smooth. However, it tends to degrade over time, particularly when exposed to direct sunlight. It’s also easily torn, so birds and pets can wreak havoc on it.
- Fiberglass mesh PROS: inexpensive, easy to work with, smooth
- Fiberglass mesh CONS: easily torn, tends to degrade over time
ALUMINUM MESH
Aluminum wire mesh is fairly common as well, and is used where added durability is desired vs. fibreglass mesh. It’s fairly inexpensive, but can be a bit more difficult to work with, since it shows dents or creases if bent. These dents and creases can also show up in daily use if the screen is pushed or bumped.
- Aluminum mesh PROS: durable, inexpensive
- Aluminum mesh CONS: difficult to work with, shows creases
PET RESISTANT MESH
Sometimes pets can be harsh on screen doors. Fibreglass mesh in particular is fairly easily torn by animal claws, and even aluminum mesh can be torn by a larger dog. For such cases, pet-resistant mesh is available to resist tearing. These are composed of vinyl-coated polyester strands. The strands are much thicker/heavier than the strands in fibreglass and aluminum mesh, and are up to 7 time stronger. Because it’s a heavier mesh, it blocks more light and visibility than standard mesh.
- Pet resistant mesh PROS: very tear resistant, long-lasting
- Pet resistant mesh CONS: can be expensive
SHADE/SOLAR MESH
Sometimes a screen is needed to block light, often to reduce glare or cut down solar heat gain in sunny conditions. There are many different types and grades of shade screen mesh, but all involve a densely-woven mesh that blocks anywhere from 50% to 90% of light. They are similar in feel to fibreglass mesh, and so are fairly easy to work with, but tend to be quite expensive.
- Shade mesh PROS: reduces glare and lights, easy to work with
- Shade mesh CONS: expensive, degrades faster than aluminum mesh
HIGH TRANSPARENCY MESH
Highly-transparent screen mesh is available when more “see-through” screens are needed. These meshes involve much thinner strands in the weave, and tend to be rather fragile, as well as being more expensive than standard meshes.
- High transparency mesh PROS: very transparent
- High transparency mesh CONS: fragile, expensive
Other screen meshes are available in brass, bronze, steel, copper, and many other materials. These tend to be used in commercial applications where particular strength and chemical resistance qualities are needed. They are uncommon in residential applications.
MESH DENSITY
Screen mesh is made in a variety of weave densities. The tighter the weave, the more strands there are per inch, and thus the smaller are the holes in the mesh. Most standard insect mesh has around 12-18 strands per inch. This will keep out most typical insects, such as flies and mosquitos. Where smaller insects are a problem, meshes can be used which are up to 200 strands per inch! As you’d expect, these meshes tend to be less transparent, and more costly, than standard meshes.
Subscribe to:
Posts (Atom)